
{Plank Wall} – Before & After
Man, it feels good to do a little house project again!! It seems like its been so long since doing a little DIY project on the weekend, yet im always busy?!?! But, i love the way this turned out and its all done!
Ive always thought this wall in my kitchen should be a feature wall…i always felt like it just needed something. Ive painted it a hundred times in the past 5 years, tried stripes, tried a dark color, thought about painting it white…it just needed something…

Well, as long as i can remember i have LOVED the old houses with the old plank walls – especially the ones painted white. Makes my heart go all pitter patter :)
So – plank walls i will have!! I researched several different options for the right product at the right price. There are lots of ways to do this, but just make sure you take into account the thickness of the planks, the price, the amount of work to hang them, the ease of painting them, etc.
What i ended up finding was 4×8 sheets called utility plywood panels. They were only $11.55 @ lowes per sheet – super cheap!! And they are recommended for paint – so they were all nice and smooth (one side was a little smoother than the other).
I measured the square footage on my wall and ended up buying 5 sheets. I had lowes cut the panels into 6 inch strips (length wise, so each strip was 6″ x 8ft).


So, with my strips all cut lengthwise by lowes, i decided where i wanted my seams and cut my own strips in half just using my miter saw.

Then i just started putting the boards up on the wall. I didnt want my boards glued in case i want to take it down in the future (ya right!!), so i just used my nail gun and put a few nails in each one (i made sure to angle the nails to keep the boards from pulling out).
**I also gave each board a light sand before putting it up, mostly to smooth out the cut edges made by lowes – the dude insisted on cutting all 5 sheets at the same time, so some of the edges were a little gnarley – men…**
My only issue that i ran into was the crown molding on the cupboard, but it was easy to pop off – lots easier than trying to cut around it.
I left spaces between each plank, i didnt measure the gap, probably about an 1/8″ , i just eyeballed everything.

Of course with any home project that we do, my kids do a little time capsule and write on the walls! Zailee wrote something about “my awesome mom built this plank wall” – she is such a smart little girl ;)

Then i filled all the nail holes and gave the whole wall a light sand before painting. I was kinda dreading that part, but it only took about a half hour.
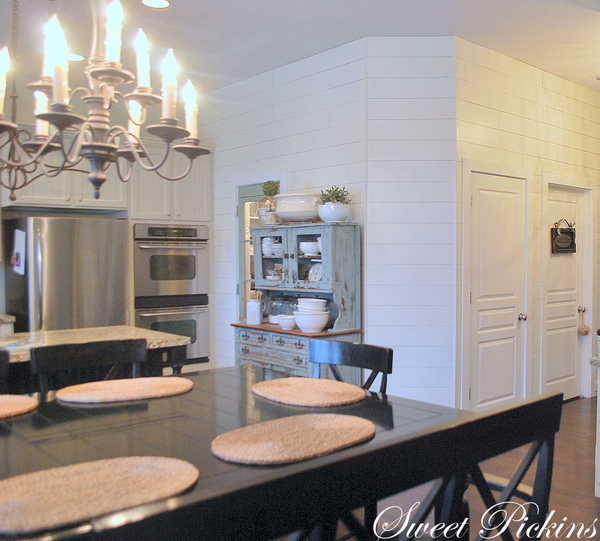
By the way, on that corner wall, i have rounded corners and needed to cover up the gap where the planks meet. I found some cove molding @ Home Depot and just used it the opposite way that it was intended for – it worked perfect. I decided not to put any type of finishing molding on the ceiling or around the baseboards.

Ok – at this point i admit, i was a little scared!! It seriously looked like i just built and outdoor shed in my kitchen!

But, once i got it painted, i was in love! I love everything about it – the texture, the drama it brings to the room, how that wall is now finally a feature wall, the character it brings to the space, the white! Everything!
The painting wasnt bad like i thought it was gonna be. I considered painting the planks before i put them up, but i just wanted to get to work! Iwill be doing this project again and i will do it the exact same way. For the bigger gaps, i painted between them, but for the most part i didnt and you cant tell.
I used Sherwin Williams paint and did 2 coats. I had them color match BM Mascarpone and i used a satin finish.


I love all the white with the pops of color – totally makes me want to paint my house white!

So, i have already filled up that little diagonal wall with a little project yesterday from some reclaimed lumber. Its big & dramatic and i love it!! Come back tomorrow and i will show you what it is :)
************************************************
Sidenote – i will be starting my kitchen cabinet painting this week – so excited to get it done! I will be painting the cabs the same color as the new wall – i know it wont be a very dramatic change, but i def think it will make a big difference overall and will be more of the “classic white cabinet look” that im after. SO E.X.C.I.T.E.D

